Board & Batten – Grid Wall
Morning friends! A few months ago the Mr and I determined it was time for a change of pace and listed our home on the market (more on that to come). Now, despite all of the improvements we’d managed over the past year, I couldn’t help but feel hopelessly underwhelmed with reviewing our living room space.
When we first moved in, the entirety of the main level was wall to wall, floor to ceiling, every nook and cranny in a harsh and very unflattering yellow. It felt busy and not in a good way. More like a slept through your alarm, rushed out to your car, and realized halfway to the office that you had coffee on your shirt kind of busy. Have you ever felt that way about the color in a room? It was a first for us.
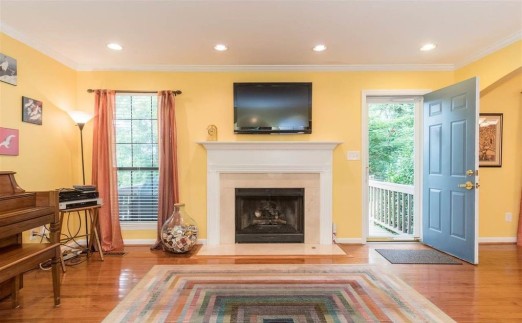
To calm down the overall feel of the space, we reached for our tried n’ true “Grey Owl” by Benjamin Moore and said our farewells to the hectic yellow. And well, that might be how it remained for almost a year… Just a big ol’ neutral canvas that we kept mulling over.
We’d recently added traditional styled board and batten to our entryway and we might’ve still been crushing on how it all turned out. In lieu of that, we decided to look at different ways we could incorporate the battens in a more unconventional way. After a few suggestions and a bit of good ol’ Pinterest inspiration, we elected to try our hands at creating a board & batten inspired grid wall.
Now bear with me here! The Mr and I tackled this project about four months ago and so the exact details are a bit hazy. With that in mind, I hope that this provides a good idea of where to start as we found the overall design to be surprisingly simple!
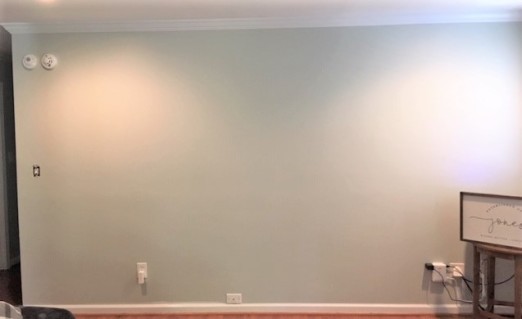
Phase 1: We began by painting the wall with two coats of “Decorator’s White” by Benjamin Moore in a Satin finish. We exclusively use Behr Marquee paint & primer in-one in our homes as we’ve found it to be extremely durable and stain-resistant.
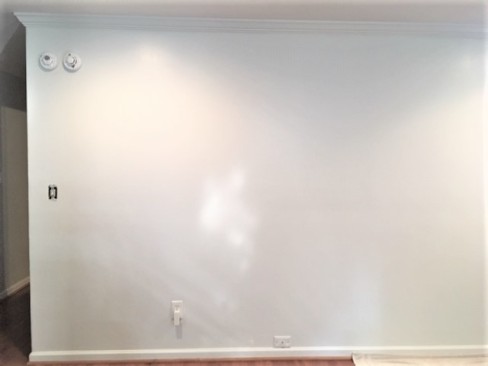
Phase 2: Next we measured the wall’s dimensions which came out to 168″ wide by 90″ tall. In our case, we elected to keep the existing baseboard and crown molding to cut back on cost and time. I’ll never pass up on savings!
Phase 3: With our measurements noted, we began determining how we wanted the overall layout to look. Neither myself nor the Mr wanted the wall to look too busy, it had long since had -enough- of that. As we are both visual folks, I quickly made up a few options in Microsoft Paint that we could compare side by side.
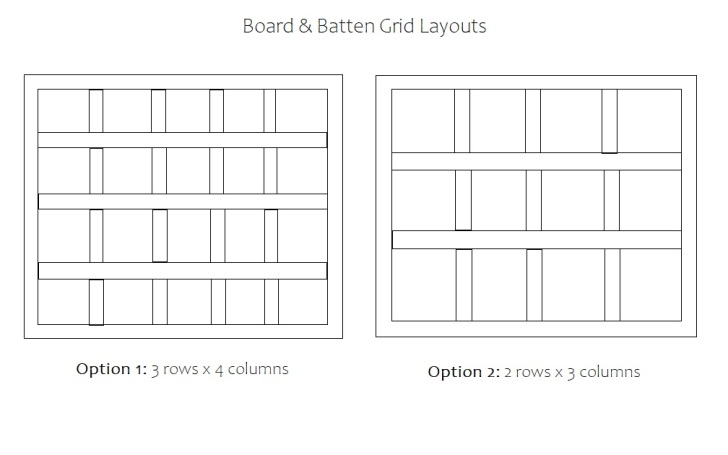
I’m SO glad that we took the extra time to do this step! In theory, we both thought that we would prefer the aesthetic of Option 1. After comparing it to Option 2 however, it suddenly felt VERY busy. Going with ‘less is more’, we decided to move forward with Option 2.
Phase 4: Select what materials you’d like to use for your battens. Wanting a subtle look we opted for 1/4″ thick MDF in 24″ x 48″ panels that we’ve used in many previous projects. Each panel is lightweight, easy to cut, and paint. We’re also in love with the cost at $7.98 per panel. (You can find them on www.homedepot.com under the SKU#: 354221.)
(Note: Each panel is 24″ x 48″ in size. Using 4″ wide battens will give you 6 battens per panel.)
Phase 5: Determining the spacing between each grid square (or in our case – rectangle) Though it’s not an exact science, we determined the number of panels needed based off the following:
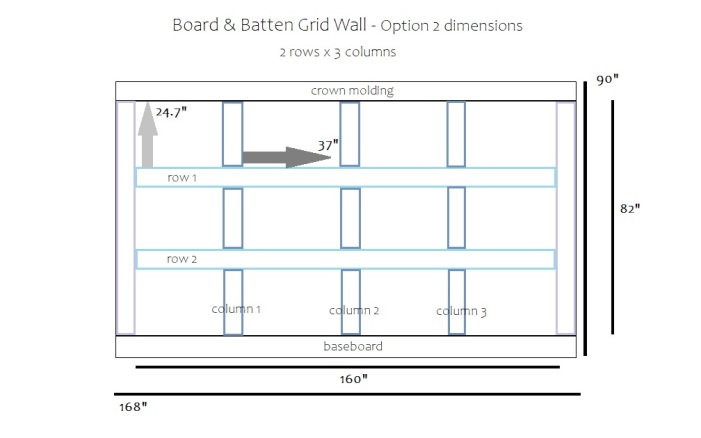
Height: 8 battens OR 1.3 panels
- For two borders (outlined in purple):
- 90″ (wall height) subtracting 8″ (crown & baseboard combined height) = 82″
- 82″ multiplied by 2 (total # of border walls) = 164″
- 164″ divided by 48″ (length of MDF panel) = 3.4 battens
- For three columns (outlined in dark blue):
- 90″ (wall height) subtracting 8″ (crown & baseboard combined height) = 82″ tall
- 82″ subtracting 8″ (4″ width for both horizontal rows) = 74″
- 74″ divided by 3 (1 column comprised of 3 vertical battens) = 24.7″ per space
- 24.7″ x 9 (total # of vertical battens) = 222.3″
- 222.3″ divided by 48″ (length of MDF panel) = 4.6 battens
Length: 7 battens OR 1.2 panels
- For two rows (outlined in light blue):
- 168″ (wide) subtracting 8″ (two 4″ wide border battens) = 160″ wide
- 160″ multiplied by 2 (total # of rows) = 320″
- 320″ divided by 48″ (length of each MDF panel) = 6.7 battens
- For width between each space:
- 168″ (wide) subtracting 8″ (two 4″ wide border battens) = 160″ wide
- 160″ subtracting 12″ (three 4″ wide vertical battens) = 148″
- 148″ divided by 4 (total # of horizontal spaces per row) = 37″ per space
Total Needed: 15 battens OR 2.5 panels
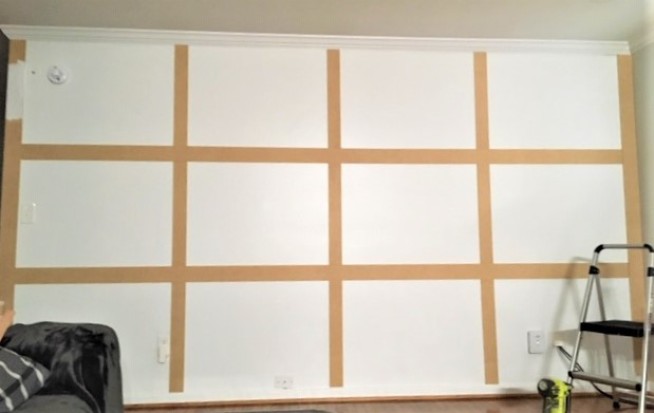
Phase 6: After cutting the battens to the appropriate sizes, we began by first fastening the border wall battens in place to finish framing the outline of the wall. We used both liquid nails and our nail gun to attach each batten piece.
Once we finished the outline, the next step was attaching the first row by measuring down 24.7″ from the base of crown molding. Once the row was in place, we measured down 24.7″ from the base of the first horizontal row to ensure the spacing for each row would be as close to 24.7″ as possible.
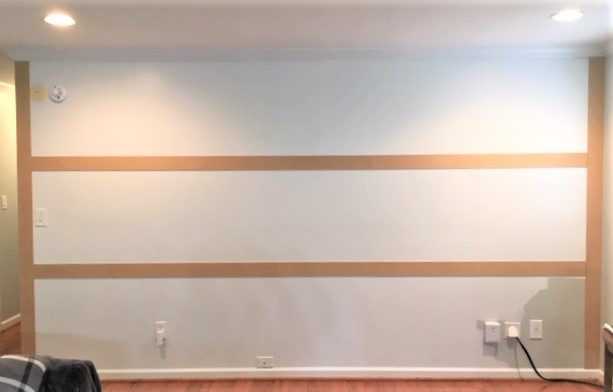
To keep our measurements simple, we cut each vertical batten piece to 24″ as we knew we’d be going back over with caulking between where each batten butted up to each other to eliminate any visible seams. (Make sure to re-measure before fastening each one, though they should fit in snugly between the rows.)
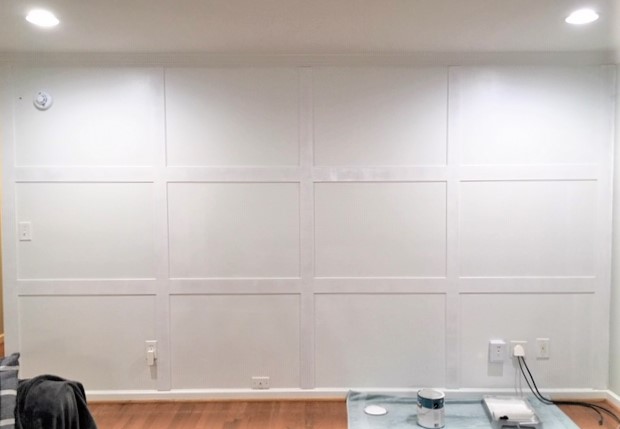
Phase 7: Queue the homestretch! We added caulking where needed to eliminate any visible gaps or seams between the battens and existing molding. Next we applied a small amount of putty over each nail and sanded it lightly until smooth (once the putty had dried). I recommend vacuuming and then running a damp cloth over each piece to make sure it is free of any dust / debris before painting your battens. To ensure good coverage we applied 3 coats of “Decorator’s White” by Benjamin Moore in a Satin finish.
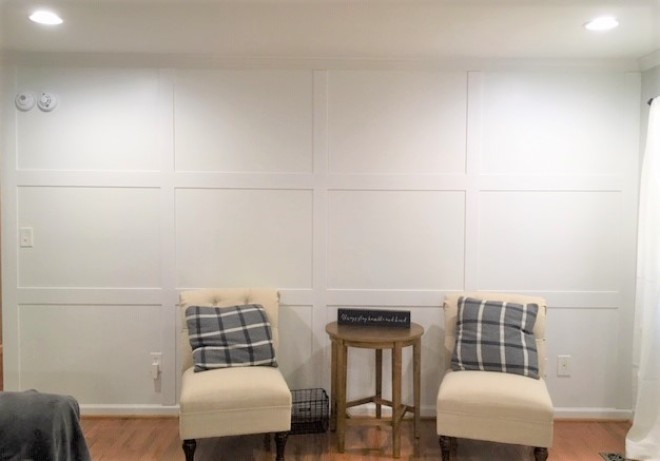
Et voila! As we had the paint, rollers, liquid nails, and nail gun available on hand it made the accent wall a breeze. We were able to sneak away with only purchasing 3 panels of the MDF and completed our project for under $30!
What do you think? Not bad for a first try, shoestring budget, and one day to complete. At least we sure think so. Fan of the grid-layout? Prefer a more traditional look? Let me know your thoughts!
Cheers!
~Christy